From an indoor autoflower indica that doesn’t get any higher than 50 centimetres to a sativa tree in the garden that reaches up to the bedroom, and everything in between. No two weed plants are the same. What these 2 extremes have in common is that you can significantly influence the yield by the way in which you cultivate them. You could easily double your harvest by applying the various cultivation techniques that we briefly explain in this article.
We cover the following advanced cultivation techniques in this article:
- ScroG - Screen of Green
- Trellis
- SoG - Sea of Green
- LST - Low Stress Training and mainlining
- HST - High Stress Training
- Soil-less cultivation (hydro, coconut and aero)
Are you new to growing cannabis? Then take these 8 steps for it. What we discuss below might go over your head.
Growing Weed Professionally
...is not allowed. By professionally is meant that you earn money in doing so. But in popular parlance it means you go about it properly and in an informed way. One of the conditions of the tolerance policy surrounding home weed cultivation is that you don’t use professional equipment for growing weed. The police and judicial authorities currently turn a blind eye to cannabis growing as long as it involves only personal use on a small scale, with no risk of fire or other public nuisance.
That said, there are ways in which you can increase your weed yield. Even with just one plant. So, is it difficult to cultivate weed? It’s only as difficult as you yourself choose to make it. Please note: the more advanced your system of cultivation, the more difficult it will be to convince the judge that it’s only for personal use. Better for weed growers to be warned in advance than to find out the hard way. Let’s get started.
ScroG (Screen of Green)
Because a weed plant can never get too much light.
What is Scrogging?
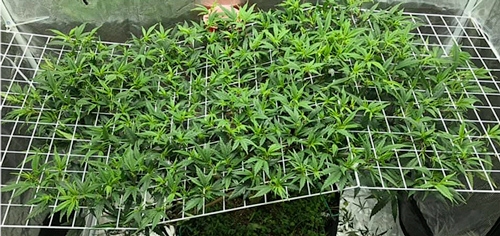
The Screen of Green method, or scrogging, involves placing a net, mesh or trellis above the weed plant so as to slowly but surely make the plant spread out. It’s the ideal technique for increasing the yield for indoor cultivation because it allows you to encourage your weed plant to grow more in width than in height without putting much stress and strain on the plant. Not only does this afford more light to more parts of the plant, but also prevents the plant from getting too close to the lamp whereby the leaves and buds could get burnt. You can also scrog very well outdoors to make your weed plant bushier. All you need is four sticks and a strong net.
SCroG
Place the mesh while still at the seedling (young plants) stage and leave them to grow through. As soon as the buds extrude, carefully push them back by bending them through another hole in the net. Repeat this process until you have filled the entire scrog net. This will ensure that all parts are receiving light. Scrog is often combined with pinching out / lollipopping (see LST below) to keep the plant’s energy in the upper part of the foliage.
The Pros and Cons of LST at a glance:
✔️Suitable for almost any strain.
✔️Useful for small growing areas
✔️Highly suited to autoflowers.
✔️Produces compact plants that stay under the lamp or fence.
✔️Can be combined with other cultivation techniques for an extra-large harvest.
❌Every so often, you have to push the buds back into the net and adjust the height of the net.
❌Frequent pinching-out is necessary (see HST heading below)
Weed Trellis
Look on it as 3D scrogging.
What is a Trellis?
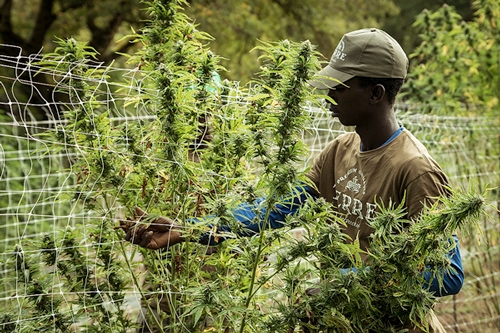
A trellis is a kind of vertical framework featuring a grid-pattern screen. In actual fact scrogging is a form of trellising. You can easily put together a low-tech framework with some sticks or PVC tubes and mesh, and position it where you want. You can use it anywhere. It provides your weed plant with support and by weaving the plant through the mesh you can drastically increase the yield.
Trellis
The Pros and Cons of a Trellis at a glance:
✔️Highly suited to outdoor cultivation.
✔️Provides support to heavy branches and buds, and protects against wind.
✔️Stimulates enormous growth.
✔️Can be combined with other cultivation techniques for an extra-large harvest.
❌Cannabis trees create a significant amount of attention and odour nuisance.
❌The plants need a lot of attention (weaving it through the trellis takes up time and topping or fimming is recommended).
❌Not for beginners.
SoG (Sea of Green)
Because you want to cultivate quickly in order to re-cultivate quickly.
What is Sea of Green?
Not to be confused with Screen of Green. With SoG you don’t use a net or mesh – it’s more about what you do with the lighting schedule. The objective is to force weed plants into flower earlier and thus harvest them at a younger age. This gives the potential for multiple harvests per year. Your objective is as many plants as you can in the least possible area. Sea of Green is an actual indoor-growing technique.
For photoperiod weed plants – You germinate as normal but as soon as your plant is ready for the growing phase and has 2 to 4 mature (serrated) leaves, you subject it to 18 to 24 hours light per day. This means less rest and accelerated growth. You set one or two plants every 30 centimetres. It’s really ideal if you occupy all the space by using square pots which can be placed right next to each other. Set the light to 12/12 once the plants are just 20 centimetres high. This will accelerate the tiny plants into flowering. Prune (pinch out) the lower parts of the plant. This part of the plant gets no light because it’s obscured by the sea of green above it.
For autoflowers – Leave the light at 18 to 24 hours per day, pinch out the lower parts and harvest in good time. Choose autoflower weed seeds that have a short total maturity period (seed to harvest).
The Pros and Cons of Sea of Green at a glance:
✔️Cultivate several harvests per year.
✔️Highly suited to Fast Flowering Seeds.
✔️Increases the total yield per year.
❌Complicated with lots of ifs and buts involving light and watering.
❌Large surface area needed.
❌Good ventilation required.
❌Infections like mildew and spider mites can easily spread to all plants.
❌More than 5 plants needed to make it viable whereby the local police may not so easily turn a blind eye.
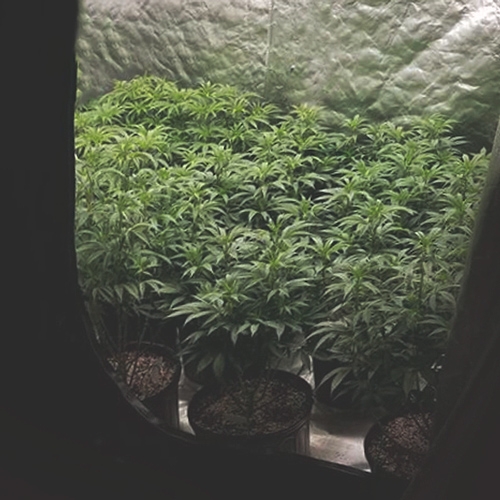
Ideally you put the plants in square pots and line them up right next to each other but this gives you an idea of the Sea of Green.
LST (Low Stress Training)
Because almost every weed plant can use some room.
What is LST?
Low Stress Training is easy to explain. You bend branches towards the ground so that they grow horizontally. The objective is to create more space and increase the surface area that gets light – the plant gets bigger and the yield increases as a result.
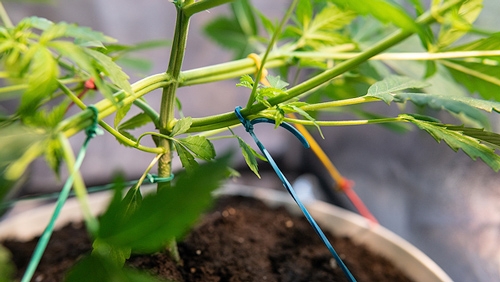
LST | Low Stress Training
Begin LST with young plants while they are still flexible. Tie strings around the young side branches for example and tie the other end under tension to holes in the side of the pot, or use stakes when the plant is growing in open ground. Make sure you don’t damage the plant’s roots with the stakes. This technique is suitable for almost any plant but does call for a certain amount of attention and a gentle touch. You should also choose soft string and not thin metal wire. The latter could seriously damage your plants.
Mainlining - LST is often combined with an HST technique like topping or fimming, which we will explain more about. Mainlining is a really special manner of Low Stress Training in combination with topping.
In mainlining you bend every side branch which originates as a result of topping towards the ground so that they grow horizontally. You cut the top off each new shoot and repeat the procedure. In this way a multitude of new branches are formed giving a potentially enormous surface area to a single plant. After that you could implement scrogging by placing a net (see above) for additional gains.
In any event you should cease LST and mainlining from the second week of flowering. During flowering the branches become more stiff and can easily break even if they are already fitted with a string or clip. Therefore it’s best to remove all such devices as soon as the first buds begin to flower.
The Pros and Cons of LST at a glance:
✔️Suitable for almost any weed plant.
✔️Can be repeated several times.
✔️Can be combined with other cultivation techniques for an extra-large harvest.
❌ You need to be patient and have a gentle touch – you are working with delicate, young plants.
❌ Chance of damage if too heavy-handed.
❌Plastic pot needed in which you make holes, or stakes that can potentially damage the roots.
HST (High Stress Training)
Because some weed plants can handle a lot of stress and become stronger as a result.
What is HST?
Let’s crank up the stress level. High Stress Training is a collective name for techniques to do with exposing your weed plant to a good deal of stress which you cause by deliberately damaging your weed plant. In short: a cultivation technique for which you really need to know what you’re doing. Although as a rule you shouldn’t expose the plant to stress during flowering, there are techniques that are carried out precisely during the flowering. Here’s a quick list of which cultivation techniques are encompassed by HST:
Topping - Topping your weed plant is fairly simple. The only tool you need is a strong nail. Nonetheless, we recommend you use a disinfected knife to prevent the plant from becoming diseased. The idea is that you remove the top after the plant acquires 3 or 4 nodes (branches). That will lead to two new tops growing. Topping also boosts leaf growth lower down the plant. You can do this multiple times to cultivate a healthy plant with lots of main branches and multiple fat buds. And it’s the ideal way in which to keep your plant low with little effort and without restricting your yield. Clear instructions in this Quick Tip.
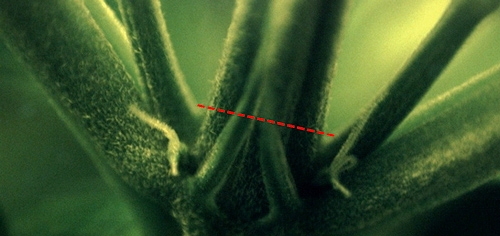
Remove the top of the stem right there
Fimming – With fimming it’s a bit more involved. Instead of removing the entire top, you cut away just the upper section of the top. The idea is to generate four new branches in place of two. But you have to snip or cut very precisely which involves taking more time. The risk of infection for your weed plant is also greater than when you cut off the entire top.
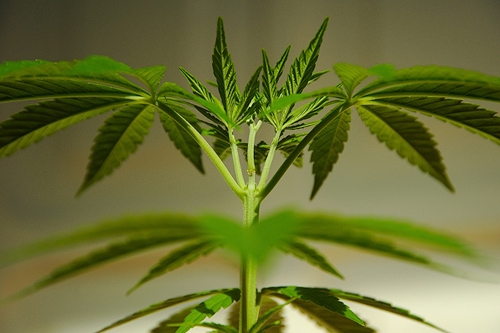
The profusion of young leaves on top is the result of fimming.
Pinching out / Lollipopping - With indoor cultivation the light is not always evenly distributed. Especially not with SCRoG or SoG, because there is a large amount of leaf cover hanging over the underneath of the plant. Therefore it’s worth cutting away the lowermost buds so that all the energy goes to the top of the weed plant. What you then get is a bare stem and a ball-shaped top that resembles a lolly. In the second week of flowering, just cut away the bottom part that is getting no light. Generally speaking, you don’t have to pinch out weed that’s grown outdoors. The sun is better able to reach the underneath of your weed plant than a grow lamp.
Splitting / Cleaving- A different, controversial growing technique is going the rounds among outdoor growers. In the final weeks before the harvest, make a vertical cut in the stem of the weed plant from the bottom branches down to about 2 centimetres above the ground. Depending on the plant’s size, this cut will usually be some 15 to 20 cm in length. A good rule of thumb is from just under the first node downwards. Tie some string around the beginning and end of the cut to mark it and stop it splitting further. Place 3 skewers or pencils between the cut to stop the stem from closing back up. The idea is that the increased stress will boost the production of cannabinoids and thus the strength of the weed but proof for the idea is lacking. This technique gives your plant maximum stress. Not for beginners!
Super Cropping / Stem maiming - This is a variation on LST in which you bend the branches until they snap and fold over. The intention is not to break the branch off completely or to tear the bark. View it as like a kink in a garden hose of approximately 90 degrees. Take a branch to which you want to apply this between your fingers or hands and fold it downwards pressing the two parts towards each other. You can use tape to provide support to the kink. The objective is to give other branches access to more light and thereby develop more even growth without cutting the leaves off.
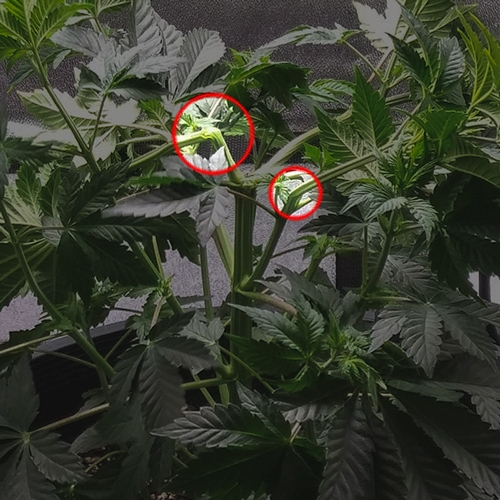
HST Super Cropping: kink the branches without breaking them. Applying a certain amount of skill.
What does HST achieve?
With HST it’s all a question of risk versus reward because the higher the risk of the cultivation technique applied, the greater the potential yield. It’s hard to express in terms of weed yield because there are many factors that can influence the yield in a positive or negative way. A doubling of your yield is, though, a real possibility. What about combining HST with other cultivation techniques? Then the sky’s the limit but watch out that your weed plant can actually withstand this.
The Pros and Cons of HST at a glance:
✔️Less material necessary than for other cultivation techniques.
✔️Can be repeated several times.
✔️Big rewards for growers willing to take the risks.
❌Not for beginners or those without a steady hand.
❌Possibility of infections or too much stress which can lead to the entire harvest being lost.
❌Some weed plants are not suitable for this. If that is the case, we point it out in the product description.
Soil-less. A Different Growing Medium than Soil
Because you know exactly what your plant needs (and know what it can do without).
Plants need water, food, light, carbon dioxide and nitrogen. Other important factors are humidity, acidity (pH) and temperature. Once you have the balance of these factors under control you qualify for a diploma in green fingers. All this means that by definition plants do not necessarily need to be grown in soil. Potting compost and garden soil do have the advantage of being rich in nutrients, slightly aerated and able to retain a certain amount of water, but that’s it. What are the alternatives?
Hydro Cultivation / Hydroculture (hydroponics)
Cultivating with water. The idea of hydrocultivation is that you dissolve the required nutrition in the water and allow the mixture to continuously trickle past the roots. Hydroculture covers a number of cultivation types. A few of the options from which you can choose are deep water culture, the drip system and the nutrient film technique. Commonly used hydromediums, as they are called, are clay pellets, rock wool and perlite. With these highly aerated mediums, you ensure the plants are kept upright. Coconut fibre is also a particularly good medium but you have to devote a good deal more attention to cultivation on coconut. This is how the mentioned hydrosystems are deployed:
Deep water culture - Set the plants in buckets that contain a quantity of dissolved nutrition. An air stone looks after the oxygen for the roots.
Drip system - Set the plants in a large container that you fill with the growing medium of your choice. The idea is to allow the roots to grow nice and long and have enough air. Therefore the container has to be sufficiently large. A pump manages the supply of water containing soluble nutrition and slowly and continuously drips it on the weed plants via a piping system. There is a reservoir under the plant container to catch excess water. The pump is located in the reservoir. This rounds off the circle.
Nutrient Film - The idea here is similar to the drip system. Here, too, you have a reservoir that contains a pump but also an air stone to create oxygen in the reservoir. The difference is that the water is not pumped to the drippers but to a sealed grow box that is at a slight angle. The weed plants are planted in a row in the grow box. Fresh water is pumped into the high end and it flows through the tube by means of gravity to the other (lower) end and out of the box back into the reservoir. The roots of your plants are hanging in the flowing water.
Cultivating on Coco / Coco Fibre
By far the most popular method is cultivation on coconut fibre because this most closely resembles traditional growing in potting compost or garden soil. This is where soil and hydrocultivation meet. The advantage of cultivation on coconut is that just like with cultivation in soil you can simply water by hand. This means there is no requirement for any complicated system and it forms the perfect way in which to learn to cultivate with advanced hydrosystems.
There is though a crucial difference because coconut is not the same as soil. It’s much more aerated and does not in itself contain any nutrients. The fact that the medium is more aerated is beneficial to root growth. This enables them to more easily absorb oxygen, water and nutrients thus resulting in faster plant growth and ultimately a bigger plant.
Moreover, the medium is less good than soil at taking up water. You might think that this is a disadvantage but it actually works in your favour. It’s virtually impossible to overwater with coconut. An important difference: water more often and with more water. Coconut must not dry out. A good rule of thumb is when you see the water leaking out of the bottom of the pot. When watering, always provide feed. A brief summary of the EC values is given below (see packaging or documentation for the feed).
- Seedlings: mild solution with EC values between 1.3 and 1.5
- Growth Phase: EC value 1.7
- Flowering Phase: EC value 2 to 2.2
- Final two weeks before the harvest: water (don’t give any more feed) so as to still keep moist
If you treat your plant on coconut correctly then you can significantly increase your weed yield using this special method.
Aeroponics
Comparable to hydroculture. The biggest difference is that the plant is not continuously standing in water but rather a fine mist, provided with nutrients, flows continuously past the plant’s roots. When you see the installation it looks like something straight out of science fiction. The roots of the weed plants resemble full-blown aliens.
The philosophy is that the roots determine how big the plant and the buds get. The more nutrients the plant can absorb, the more of it goes to the branches, leaves, and ultimately the flowers of the weed plant. With aeroponics you stimulate root growth in a special way by making nutrients directly available everywhere and simultaneously. But it’s definitely not for everyone and there are many risks associated with cultivation in air and mist. You have to have a complete tubing system, lots of room and a sophisticated control system that precisely regulates the correct ratios of feed, water and temperature. Apart from the complete systems that you can buy for this, it’s not for professionals. It’s for mad scientists.
The Pros and Cons of Aeroponics at a glance:
✔️Plants grow faster and get bigger - a high yield in less time
✔️There is a lot to learn about this subject
✔️Cultivating space-age plants - far out!
✔️Can be combined with other cultivation techniques for an extra-large harvest
❌Particularly large number of components required - tubing system, mist generator, special feed, computerised control system and natural lamps and switching equipment (indoors only).
❌Slight issues with any or all of these components will negatively impact your weed plants
❌Really complex to grasp and even more difficult to put into practice
Our Favourite Cultivation Techniques
At Dutch Headshop we have a number of favourite techniques. The combination of scrogging and topping, whether or not with plants on coconut fibre, is the most popular. They are simple, low-tech and budget-friendly with low risk for the plant or a potential criminal record. For indoor cultivation in the MiniGrow Box One | Grow Cannabis we recommend pinching out the leaves at the bottom to harness as much as possible of the energy provided by the LED lamps to the upper leaves and buds.
Dutch Headshop accepts no liability for any infringement of the applicable rules surrounding the cultivation of cannabis in your country or region. All information on our website is there to provide information. Responsibility for the application of the the cultivation techniques in this article lies entirely with the reader.
