Botrytis cinerea is better known as bud rot; every grower's nightmare. The grey mould occurs mainly at the end of the flowering phase. It can ruin your harvest at the last minute, after a lot of time and effort. Identifying and controlling bud rot quickly is a skill that can prevent a lot of trouble. Here you can read how to get rid of this weed mold and get tips on how to prevent weed bud rot.
In this article:
- What is Bud Rot? | Botrytis cinerea
- Recognizing Bud Rot
- Bud Rot Prevention: 6 Tips
- Fighting Cannabis Bud Rot
- Smoking Bud Rot is Not a Good Idea
- Other Weed Mold: Mildew
What is Bud Rot? | Botrytis cinerea
Botrytis cinerea is a necrotrophic parasite with many different names. In the Netherlands, botrytis is known as fruit rot or grey mould. Internationally it is known as brunch rot or grey mould. In the cannabis world we know this weed mold as bud rot of course. It is the nightmare of every weed grower.
Botrytis cinerea is not only a fear of weed growers. In viticulture it is considered one of the greatest dangers. Top rot is therefore most common in wine grapes. Special dessert wine is even made from infected wine grapes. In addition to grapes, Botrytis also chooses tomatoes, strawberries, cauliflowers and many other plant species as its hosts. So that dreaded bud rot has already ruined quite a few harvests.
Botrytis cinerea is propagated by wind or water. Spores from the mold can land on other plants by wind and spread through small wounds. It develops and grows best on moist crops. Soaking wet weed tops and plants with small wounds are a paradise for the mold. Keep them dry and do not damage them!
Recognizing Bud Rot
How can you recognize that nasty Botrytis cinerea or bud rot? First of all you need to know that bud rot mainly occurs with high humidity and wet crops. If you translate that to growing weed, then you will see it most often during the flowering phase of your weed plants. Especially if you're growing weed outdoors, you might encounter it in the last weeks of flowering. Most photoperiod weed strains will flower by the end of August. Autumn begins at the end of September and this guarantees high humidity. In addition, from the end of September buds will grow on your weed plant. If the buds stay damp for a long time and/or the humidity is too high all the time, bud rot is lurking.
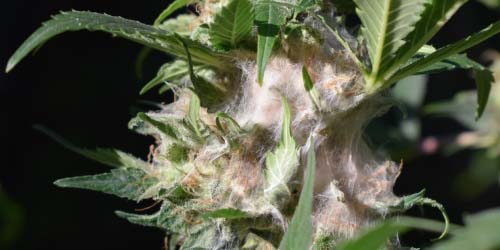
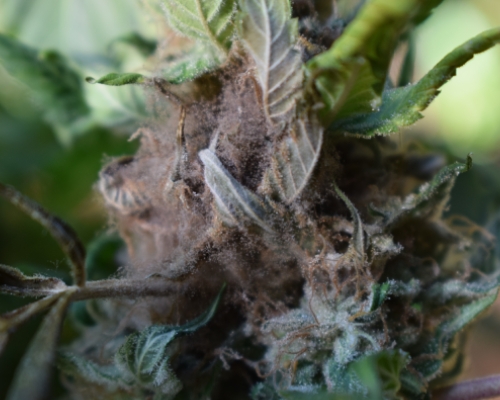
Now you know when to expect this stubborn weed mold. But what does it look like? You should know that bud rot grows from the inside. So it is difficult to recognize, because you are not going to inspect each bud from the inside every time. You can recognize bud rot by the white fluff. This is the first stage of this weed mould. Do you not notice this and let bud rot run its course? After a while you can recognize it by dark brown spots that dry out your buds from the inside. The last stage is the grey mould fluff. If you have only just managed to recognize bud rot at this stage there is a good chance that other parts of the plant have also been infected and you have a real problem. From this misery the weed mold owes the name 'grey mould'.
In other words: do you see any white fluff, dark brown spots or grey mould between your buds when your weed plant is flowering? That is bud rot. Bad news!

You can recognize bud rot by this fluff.
Bud Rot Prevention: 6 Tips
Before we tell you how you can combat bud rot, let us give you some tips on how to keep this nasty weed mold out. Bud rot is hard to fight off. Once infected, you're screwed. But more about that later. Read these tips carefully. If you are dealing with bud rot at the moment you will want to avoid it at all costs during your next grow.
1. Make sure your weed plants are healthy
This, of course, applies to all problems with weed plants. If your plants are not healthy or have something wrong with them, they are more prone to diseases. A healthy weed plant starts with a good basic knowledge of growing weed. In addition, you have to make sure throughout the growing process that they do not suffer from deficiencies or surpluses. Then there are other weed fungi, diseases and pests. They drastically reduce the resistance of your weed plant, giving bud rot a chance. Health first!
As you have read, weed bud rot loves small cuts in your weed plants or damage to the buds. It is through these cuts that the spores of the grey mould spread most rapidly. Prevent wounds by trimming or applying cultivation techniques. When you use binding wire for any reason, choose soft binding wire. It will not damage your plant.
2. Make sure there is enough air circulation at all times so that buds can dry properly
Bud rot occurs when your buds get wet. So try to keep your buds dry by making a roof for outdoor weed. Or shake your plants dry after a big rain. Of course you cannot 100% prevent your weed plants from getting wet. It is good to know that they need fresh air to dry. Without air circulation there is no fresh air. So without air circulation it takes longer for your plants and buds to dry.
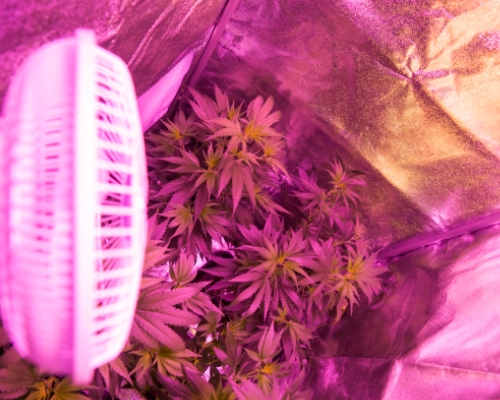
Especially when you are growing weed indoors you have to take care of air circulation. A fan is essential. If you are growing outside it is best to put your plants in a place that is exposed to the wind. Is there practically no wind for days on end and is the humidity high? Then you can consider some extra air circulation. So: do you want to prevent bud rot? Buy a couple of big fans and make sure you have fresh air. Be careful not to place the fan directly on the plants. The ladies do not like that.

Good ventilation ensures that your buds dry better, the humidity remains low and the air circulation is adequate.
3. Reduce humidity
This is particularly true when growing indoors. When your plants are in an indoor growing space during the flowering stage, you should bring the humidity down. There is not much you can do about it outdoors, but indoors there is. With sufficient ventilation you can bring the humidity down. A ventilator and holes at the bottom and top of your growing space are recommended. Furthermore, you can drain off the excess nutrient water that ends up in the dish under the pot to keep the humidity down. Drastic measures such as dehumidifiers may be necessary when humidity levels are extremely high.
You can easily measure the humidity with a hygrometer or moisture meter. The ideal air humidity during the flowering period is between 30 and 55%. In the second half of the flowering stage, you should ideally want to keep it a bit lower than in the first half. Here is an overview of the desired air humidity for each phase of growing.
- 60% to 70% for seedlings
- 45% to 70% during the growth phase (try to decrease slowly)
- 40% to 55% during the first few weeks of the flowering phase
- 30% to 55% during the last few weeks of the flowering phase
- 50% during weed drying
- 62% during weed curing
- 55% to 62% during weed storage
Besides preventing bud rot, a lower humidity is also beneficial to the smell and taste of your weed. With a lower humidity certain substances in weed get a better chance to 'mature'. So controlling your humidity is always advisable.
4. Choose a mould-resistant strain with a short flowering period or an auto flower
Especially useful with outdoor weed. Bud rot is most common during the last phase of growing. Weed plants usually only start to flower at the end of August because of the difference in light hours per day. So during the last weeks of the flowering phase it is autumn. Your plants will be wet more often and the humidity is high. Weed bud rot is lurking. There are also normal photoperiod strains that flower earlier. This has to do with the genetics. These strains are hypersensitive to light and can therefore start flowering as early as July, which means they are ready in August or September. You can also find various mould resistant strains in our seed shop. Examples are the White Choco Auto flower by Amsterdam Genetics?, Hollands Hope by Dutch Passion and Wedding Cake from our private label.
There are various ways of ensuring that you don't have to grow as long in the autumn. For example, you can choose a Fast Flowering strain. These strains have a flowering period of less than 7 weeks. This means that you will be ready by the beginning of October and therefore spend less time growing in the wet autumn. You can also choose two auto flowers. If you start early in the season and grow two auto flowers, you can harvest before the weather gets really bad. Read more about this here autoflowers.
5. Shortening the flowering period outdoors: putting your plants in the dark or moving them indoors for the last few weeks
By choosing a suitable strain you can prevent bud rot. But you can also choose to shorten the flowering period outdoors. You can do that by growing two auto flowers per season, as described above. Two other options are to put your weed plants in a dark place or to switch to growing indoors during the last few weeks.
You can put weed plants in the dark. By doing this, you force them to start flowering earlier. It is a lot of fuss, but certainly worth the effort if you want to prevent bud rot. By putting your plants in the dark you make sure earlier in the year that your plants get no more than 12 hours of light a day. Normally this does not happen until the end of August, when the sun sets earlier. If you mimic this by putting your plants in darkness for 12 hours straight every day in July for example, they will get the feeling that they have to start flowering. So the flowering phase starts earlier. This allows them to enjoy the sun longer in August, when you stop putting them in the dark because the nights are long enough. The buds will be bigger, healthier and they will not end up in the wet autumn. Whenever you put your plants in the dark it is important that they have a fixed rhythm (the same time in and out) and that they are completely in the dark. A little light can ruin the process.
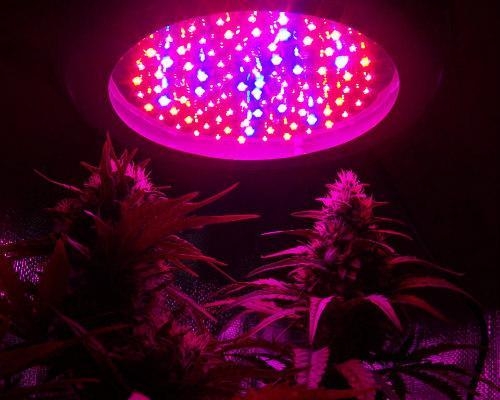
Another, more drastic way of preventing bud rot is to switch to growing indoors during the last few weeks. Find a spacious grow room and buy a good LED grow light with a spectrum that is suitable for flowering. When the weather gets really bad and bud rot is around the corner, move them indoors. It may be a risk and not everyone can do it, but if you have the opportunity it can prevent a lot of misery. Besides, you create better conditions than outside. Make sure that there is sufficient ventilation and air circulation.

Prevent bud rot by keeping your weed indoors under an LED grow light for the last few weeks.
6. Keep a very close eye on it
Our last tip is perhaps the most important one: Look carefully! If you notice that your plants often get wet and the humidity rises, then you must inspect your plants every day. Look carefully between the tops. If you find anything that looks like bud rot you shouldn't lose time. The weed mold spreads very quickly. So tackle it!
Fighting Cannabis Bud Rot
We just gave you a hint. Fighting bud rot is a hopeless task. Once your weed plants are infected with this weed mold, you can't get rid of it. So we can be very brief about fighting bud rot. If you discover it on one of your plants then you should isolate it as soon as possible. Get it away from your other plants before the spores transfer and infect the other plants.
Buds that are infected with bud rot must be thrown away. You cannot wash it out or remove it. Firstly, there is nothing left. Secondly, the bud rot is harmful to your health. Therefore it is best to throw away bud rot. If you want to be sure that it does not spread further over your plant then you are well advised to harvest the whole plant immediately. Discard the mouldy parts, leave the rest to dry thoroughly and look carefully at your other weed plants to see if Botrytis cinerea is not developing on them. In case of a large outbreak on several plants it is best to harvest everything. This will prevent a lot of misery.
Smoking Bud Rot is Not a Good Idea
The question "Can I smoke weed with bud rot?" is often asked on the internet and in our customer service department. We can be very clear about that. Do not do it! Smoking bud rot is very unhealthy. The microbial spores of Botrytis cinerea are bad for your health. Do not take a risk by only throwing away mouldy parts of the top either. Sometimes it is difficult to see and there may still be bud rot on the inside of the weed. When you smoke this you can become very ill. Besides, smoking bud rot tastes extremely bad. So do yourself a favour: throw your grey mould haze in the bin and do your best to avoid bud rot in your next grow!

Smoking bud rot is not good for your health. Don’t do it.
Other Weed Mold: Mildew
There is another kind of weed mold that you would rather not encounter. Mildew is common among weed plants. There are two types of fungal infections that we call mildew. Mildew is also called the white disease. You can recognize it by a white-grey fluff on the top of your leaves. Downy mildew, also called leaf spot, is more difficult to recognize. It starts with a white-grey fluff on the bottom of your leaves. You do not see this as quickly. The white fluff works its way through the leaves and eventually causes brown spots on the top of the leaf.
symptoms of powdery mildew on your plants? Then take immediate action. Both fungal infections require different conditions and can be fought off differently. In our blog “Mildew on Weed? Fight back if you See it!” you can read how to eliminate the weed mold.
Is there something else wrong with your weed plant? Then take a look at the article “Leaf problems with cannabis plants Part 3: Life-threatening diseases”. This is where the most common pests and diseases are discussed.
